"MAKE A CONFIDENT MISTAKE NOT A TIMID ATTEMPT"

Tuesday 31 March 2015

Looking at depth of colour in the sky and sea

Have you ever noticed.  When you paint the SKY the darkest area is at the Top, the weakest is towards the bottom...that's because the sky recedes into the distance and that is seen as a weaker colour.

The opposite happens with the SEA.... that is Darkest in the distance.  (I remember this by thinking  the further you look out to sea, that's where the sea is at its deepest...hence the Darkest colour).  The foreground (nearest the viewer) is a weaker colour.

Does that makes sence???  well, yes I think it does....look at my illustration...


Do you get it?

Hope this helps.


Thursday 26 March 2015

Ruined Brushes - Acrylic use

From time to time we all end up with a ruined brush, when the bristles dry solid and won't move. This often occurs when using Acrylic paints as they dry quick or when using masking fluid,
we forget to rinse the brush out properly.

Don't throw the brush away though, it can still have a use.


For example when you want to do some stippling...they are perfect for the job.  Just 'disturb' the bristles a little with your fingers, but don't worry if they won't move greatly, you can still use it.


Perfect for those distant tree lines and hedgerows in a painting.
The ruined brush is now a useful brush,
not only for using with acrylic paint but also for oils and watercolours.


Tuesday 24 March 2015

Watercolour loose style painting in three steps

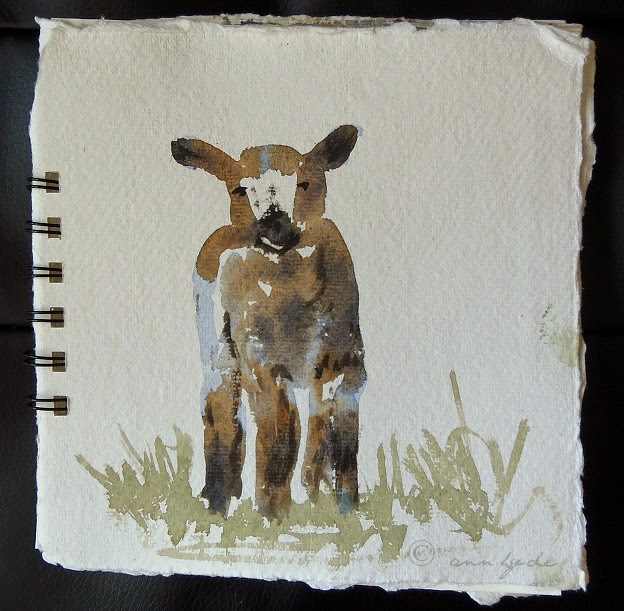
Keep in mind folks that this is my personal opinion on how I go about this particular style of painting.  Others no doubt might make the point that my technique is not for them, that's okay by me, but I just wanted to explain what I did to make this painting of a Lamb....

No pencil sketch just

 Starting with One brush full of paint
in three steps

ref. photo from PaintMyPhoto-ClareSmith

Note:  For this I used Khadi paper, and a Kolinsky Sable Brush.  Sable brushes are the best for holding a lot of paint, which was ideal for this particular technique of painting.   

Prepare your paint before you begin, so it is ready to go as you need it. 

If you look at the painting of the Lamb you will see where these Three Steps to the painting are
(I haven't shown the step-by-step in photos, I think it's better if you study the painting, that way you will be observing more) :

1. Start with the Palest tone.  (the pale tones were pre-mixes of Burnt Umber and Ultramarine Blue)
With the Palest tone I started with an ear and worked my way down, leaving some gaps of paper here and there for highlights.  (You can leave this to completely dry), but for this painting I chose to continue to Step 2 whilst the paint here was still wet.......

2. Mid-tone.    (this is obviously going to be darker than Step 1)
Look for those Mid-tone areas now and drop this into the still wet paint of Step 1.  (This is why you need to pre-mix your paints).   Now leave it all to dry completely - very important.

3. Darkest tone.
With your Darkest tones paint the detailed areas.  This is the fun part of the whole painting as this step brings out all the detail and holds the painting together.

Now all you need do is add any extra bits and pieces to your art work, for me it was the grass.

So to recap:

One Brush

Pre-mixed paint

Steps 1, 2, 3.


**************


Saturday 21 March 2015

Ruined brushes when using Masking fluid

When using Masking fluid :

To save your brushes just put a little soap on your brush first.

Then use the masking fluid.  When you have finished wash your brush out with cold water.

I actually use specific Masking Fluid brushes, but any suitable brush will do.


(note: never use warm or hot water for cleaning your brushes - the bristles are held with some glue in the ferrule and that would melt in warm or hot water, guaranteed to ruin your brush)!


Friday 20 March 2015

Watercolour paper that buckles and stretches

We've all been there.  Painting a watercolour and what happens, the paper buckles up and warps.  There are various ways to deal with this and okay, we can get pre-stretched paper and also stretch the paper ourselves, but that is a bit of a hassle don't you think.

One solution is to just buy watercolour Blocks.... the paper is glued on all sides.  This means that you paint without the paper buckling up on you.  Then when you have completed your painting you just remove it from the block.

Here's an example of one of my watercolour blocks.  There are plenty of makes out there, the one I'm using at the moment is a Matthew Palmer watercolour block with Fontaine paper.  Incidentally the Fontaine paper is quite tough and can take quite a bit of work on it


Easy!


Wednesday 18 March 2015

Opening Tube Paints

Ever had trouble opening a Tube of paint where it has dried tight closed.  Like me, you have probably grabbed a cloth or tissue to get some grip on the tube.   Well, I headed for my husband's toolbox and grabbed the pliers....

and I kept them!  

They have proved to be so useful on so many occasions...


Thursday 12 March 2015

Double ended brush


I might have mentioned this before.....or did I only 'think' about doing this particular post item!?!

Anyway, bear with me  - Here's one of my cheap brushes (I wouldn't recommend doing this with expensive Sables)!, but this particular brush comes in handy for so many different areas of a painting...

I sharpened the other end of it with a pencil sharpener...


when I need to add some trees, fences, posts etc. to a landscape
just turn the brush round -
you don't have to go searching for 
the right tool, you have it there already
Depending on the effect you want ...
   If you go straight in on the wet paint (as with the example above) you get
a darker outline (basically the paint fills in the lines you have drawn)
 If I had waited a bit longer I could have got a whiter outline 

A useful brush to have if you are out and about painting and want to
keep your supplies to a minimum

**************

Painting the planets

A bit of fun, but this turned out to be an interesting experiment,
and you never know what design or pattern you will end up with.
So, this is what I did...
with some scrunched up paper (the glossy magazine kind is best)
or just use a tissue scrunched up...
either option is good, and just dab it quickly on the paint
then take something small like a bottle top and hold it on the painting....
and paint around the outside with some dark paint...
when you lift that off you have a planet...
then I just blended the edges a bit and
splattered white for more planets in the galaxy...
although I do wonder if 
I have a problem
when the Shape I see in one exercise
looked a bit like a
Lurcher!
Or am I becoming a bit
OBSESSIVE!

Wednesday 11 March 2015

Portable Mixing Palette


Many of us take a small watercolour palette out with us, be it a homemade version or a manufactured one.   By virtue of having a small palette, it doesn't allow much room for actual 'Mixing' of paints, so I've come up with my version that I find quite handy.


 ~ I laminated a piece of pure white card stock ~
 ~ Makes for a great portable mixing palette ~
~ and is easily wiped clean ~
~ and can be slipped into the pocket of my moleskine sketchbook ~

Monday 9 March 2015

When paint blooms

also called Run-backs, cauliflowers - method 2

Everyone has their own way of dealing with these annoying run-backs, but as I showed in my previous post they are easy to correct, so long as you are patient and really wait for the first layer of paint to completely dry.

I've another way of dealing with them and that's Cover them up.  Easy to do, but you have to make sure the paint you are adding, over the error, is more dense/heavier/thicker - less water with the paint in other words. 

then add some foreground rock
and it's finished...as easy as that.


Sunday 8 March 2015

Paint Splodges


PAINT SPLODGES...

Call them what you want, it's when the paint runs back on itself and eventually dries leaving what is known as   Run-backs - Blooms - Cauliflowers, all the same difference.  This is what I'm on about...


but don't panic.  
Some run-backs are good and I quite like to leave them if they are not
too obvious, it gives extra character (reason not an excuse).

However, it would be nice to know how to remove a run-back so
simply leave the painting to TOTALLY dry and I mean
REALLY DRY. 
When you're ready to tackle it, you will need a pot of clean water, not one like this which was on my desk


Use a synthetic brush (they cope better with this and saves you ruining your sables)
and have kitchen towel on hand too.

Wet the brush, but dab out the excess water then
rub over the 'run-back' area and quickly dab with the kitchen towel to dry the paper of
moisture and you have a painting minus run-back


Sorted!