"MAKE A CONFIDENT MISTAKE NOT A TIMID ATTEMPT"

Thursday, 3 August 2017

Another technique for painting trees


Everyone has their own method for painting trees,
but getting started for some can be difficult.

Here's one of my techniques,
which in fact is used a great deal by watercolour artists, in the past Wesson and Seago used this style
and current days,  J. Bowden and John Hoar.


The technique is to add JUST SUFFICIENT PAINT to you brush, so as not to swamp it.
If you feel there is TOO MUCH pigment on the brush, then just wipe it
gently over a piece of tissue paper...WITHOUT REMOVING too much.
This all comes down to practise and getting
that 'Feel' for your paint brush.

Then

 paint with the SIDE OF THE BRUSH, not the tip.

You are after a DRY BRUSH EFFECT without it being too dry.


Here's a quick demo showing you,
but in the end it all comes down to

GIVING IT A GO YOURSELVES

AND YOU WILL SEE IT WORKS.


Thursday, 22 June 2017

The packaging & Demo using Derwent Inktense Blocks

I've already mentioned Inktense blocks, and in this blog post I thought I would add a video using some.

In fact I have now got a set of 72, so lots of colours to play with.  Before I get to the video, let me show you the packaging of these blocks...


They are packaged in plastic trays,  one layer above the other...


 A good way to keep them, but lifting the top set of colours can be a little difficult.

They come with a cardboard separator, I have glued the cardboard to the bottom of the top set, 
that keeps the plastic tray firm -


Then I glued a piece of ribbon to the cardboard
which then makes a helpful handle to lift them out with.


Here's my quick demo using some of these colours.


When the ink dried, I then added some extra details...


Fun and easy to use.


Thursday, 18 May 2017

Warm and Cool tones in paintings

The balance of a painting....

This is part of a blog post I added a couple of years ago to my main blog (www.studiohyde.blogspot.co.uk), but I thought it would be helpful here too.

Warm and Cool tones in paintings. 


My example is this sketch of Barnstaple bridge.

Pen + watercolour 
plus I added a small amount of detail with
my Sailor Calligraphy pen


Note:   The majority of this painting is in cool tones:

So to balance that out I added the warm red stripe on the boat.

Equally, if a painting is mainly warm tones,
then offset it with some COOL colours

It all helps the BALANCE of a painting.


 ~


Saturday, 15 April 2017

Making waves the simple way

First some watercolour...


Let this dry.  Then add a slightly Darker tone of the same colour, basically less water more pigment...

If you want more obvious Waves, then just emphasise the shape, 
as seen in the bottom part of the next example.

When completely dry 
add White GOUCHE -
I used a flat brush for this


There you go
Simple Waves

🎨🎨🎨


Tuesday, 4 April 2017

Derwent Inktense Blocks

Quick intro to Derwent Inktense Blocks

...I've had these for some time but only just got around to doing a colour swatch! 

These are INK in a block but can be used like watercolours - the best of both worlds if you ask me.

 (Inktense - Ink - intense colour = Inktense).


I've obviously got the tin with 12 colours, but do come in bigger packs with more colour choice.


The only thing I would say, they don't appear to have the colours named.
I have found a number on them though, so perhaps that's how Derwent deal with it.


I intend to do a demo using them soon.


Monday, 13 February 2017

French Ultramarine Blue .v. Ultramarine Blue


Ever noticed that some paint manufacturers have

FRENCH Ultramarine Blue and also Ultramarine Blue

ever wondered what the difference is.


Well it's simple.  

FRENCH Ultramarine Blue is a purer, higher quality pigment paint

whereas, 

Ultramarine Blue 

it is more student grade (just as good but if you want to sell your artwork
then you should be using the better quality paints)


Friday, 10 February 2017

Mixing New Colours from those you already have

So you have a few colours in your collection, most of us have.  Some colours may be missing like SEPIA or VANDYKE BROWN, even BURNT UMBER.

Well, if you have Raw Umber, Ultramarine Blue and Burnt Sienna....these will give you those missing colours.

Here's how...

RAW UMBER + ULTRAMARINE BLUE  =  SEPIA


SEPIA + BURNT SIENNA = VANDYKE BROWN


RAW UMBER + BURNT SIENNA = BURNT UMBER


Go on, give this a try and see the outcome, 
so easy to add to your collection of paints this way.

Wednesday, 18 January 2017

When watercolour and sketchbooks don't mix

Graphite sketch - "William"


This sketchbook doesn't like watercolour.
Quite simply the watercolour seems to
disappear on the pages

Solution: use graphite or pen.


You see, when something doesn't pan out,
you just alter the way you use it.


Tuesday, 10 January 2017

When your graphite has become a stub

You know how it is, you keep sharpening your pencils and they end up as a little itty bitty stub - what do you usually do - Yes, you give up and throw them away.  Well, hang on and check this out.

SAVE those plastic covers that come with brand new brushes...most people chuck them,

Don't, 
as
you
 need to save them,
they are useful...


(some of you will have seen this clip already on
Facebook)


 ~HOPE THIS IS OF HELP AND USEFUL FOR YOU~


Thursday, 10 November 2016

Brand new brushes

Just a quick tip here :

When you buy a brand new brush (and oh isn't that great) remember to put it in some clear water for 2 or 3 minutes first...let it sit and soak up the water.   Brand new brushes have a coating on them, it holds them together before use, so you need to release that first.

You will see when the brush has relaxed and soaked up some water, you will then be able to use it with your paints.

~~~~~~~~~~~~~~


Sunday, 18 September 2016

It's all a matter of Observation

Easily said - easily forgotten

That certainly goes for painting.
As Artists we tend to observe the world slightly differently from others,
but we don't always remember to Look

Looking AROUND US at the every day 
what do we actually miss!

....example was our sun brolly in the garden....

"Was it really LOOKING at ME"!

 Easily missed, but made me THINK.


Friday, 2 September 2016

Applying Masking Tape

The usual recommendation for adding masking tape to paper, is place it on your clothes first...it takes off the excess stickiness and allows you to remove the tape from the paper without tearing it.


Although a problem with that method is, you can often lift the pile from the clothes onto the tape...not so good.

I find it better to run your hands over the masking tape, that takes off the excess stickiness very effectively and the tape still comes off the paper easily.


~ job done ~


Friday, 12 August 2016

Never mix paint with your best brush

If you have special brushes - i.e. kolinsky sables or even mixed synthetics with very good points

see pics...


You really will not want to be ruining those beautiful pointy tips.  I can assure you, if you start mixing paint with them, those tips will be no more!    Always mix your paint with a lesser brush, sometimes I use a very cheap oil bristle brush or similar, for mixing paint.  That way it doesn't matter if the brush gets ruined.


Thursday, 21 July 2016

Showing Light

 When you want to emphasise a Light area, you have to put a contrasting Dark area next to it.   Obviously this works in reverse too.

This sketch shows how that works....


Saturday, 16 July 2016

Let the paint do the work

This example sketch of a tree trunk shows how simple this technique is.  

1.  The ink outline forms the shape  

2.  I wetted the trunk with clear water

3.  Then dropped in random (and I truly mean random) colours on the right hand side of the drawing

Yellow Ochre - Burnt Sienna - *Sap Green - Burnt Umber

*the Sap Green was the only one that I purposely put to the left...don't overdo even though it is tempting!

THEN when the colours are in, I 'carefully persuaded' the paint to drift to the left, but not too much.  It's good to leave some gaps of paper showing.

Leave it to completely dry.  The magic happened all by itself...in fact the painting PAINTED ITSELF.


Go on, give it a try.


Saturday, 2 July 2016

TONAL VALUES

Having trouble finding the Lights in a scene?

Example this photo for instance:


THEN  LITERALLY  SQUINT

AND THE LIGHT AREA WILL JUMP OUT AT YOU.

Happens to be 3 areas in the above photo:

1. the sky
                             2. the reflected light under the bridge
                       3. the strip of grass that runs across the scene
 

plus by Squinting

the DARKS will be very obvious too.


SO REMEMBER TO SQUINT AT A SCENE
IT WILL HELP YOU SO MUCH WITH TONAL VALUES 


~ ~ ~ ~ ~ ~ ~ ~ ~ ~ ~ ~ ~


Thursday, 30 June 2016

Working slower

LOOSE painting does not mean QUICK painting.  Some think they need to work a piece of art in a quick way in order for it to become a Loose artwork, but NO ....TAKE YOUR TIME and your art will look all the better for it.


Monday, 20 June 2016

Using Black

Well, for a start DON'T use Black straight from the tube.  Black will totally finish off your painting.  Straight from the tube it has no depth, the light doesn't bounce back off it - basically it just falls FLAT/DULL/WITH NO IMPACT......

This is where you need to MIX YOUR OWN BLACK


I hope this will show up from the photo on my camera...

This is 
Black from the tube


Here's a mixed Black  

So from now on always mix your Black


Another alternative to Black is

Alizarin Crimson + Hookers Green
Another perfectly acceptable Black


TEST THIS OUT FOR YOURSELVES,
YOU WILL SEE WHAT I MEAN.


Saturday, 18 June 2016

Allowing Light spaces in your paintings and sketches


The First version of this riverside scene was painted in one go, 
from top to bottom

However, it has NO LIGHT SPACES OF PAPER


This Second version was painted a section at a time,
allowing some areas to dry first
and HAS LIGHT SPACES OF PAPER


Very often Beginners will paint like the First version
whereas
the Second version is something they will eventually get to with more experience.

~


Saturday, 4 June 2016

How much Detail to add

A fellow blogger mentioned to me that she tends to put a lot of detail into a painting where it isn't needed.  That gave me this blog post, as I know exactly what she means and thought I would give you my spin on how I deal with this issue.

Firstly, and most important before getting into the details of a scene, is where you begin with a painting - having the FOCAL POINT.  The place that the eye goes to when you first look at a scene.   But, how do you know what that is.

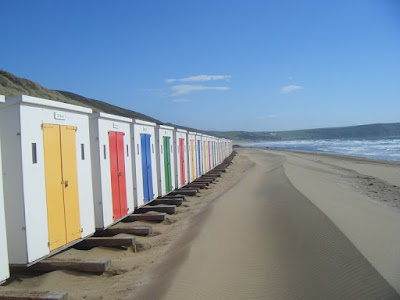
Say for example you are looking at this beach scene, either in person or using a photo:


I'm reckoning that you looked at the First two beach hunts on the left,
then your eye travelled to the distance, across the water and back to the foreground.


Then comes the matter that my blogger friend mentioned saying she tends to Add too much detail.  We are all guilty of this, but try to KEEP IT SIMPLE.      SEND THE EYE AROUND THE SCENE (as with the above photo).  

Example 1
   A quick example of the photo reference,
but I'm sure you get my point.

This is a very Basic scene - you could add some people:

 Example 2
You see I have also added some birds plus two people.

 HOWEVER
If I added more.....

Example 3
 WAY TOO BUSY

The Boat is too distracting 
The large seagull too distracting
The person with the dog too distracting

SO
KEEP 
IT
SIMPLE


 ~ Happy Painting everyone ~


Wednesday, 11 May 2016

Painting Trees

There are various methods, but for today I thought I would share this version -

Simply by using scrunched up kitchen towel,
so it couldn't be easier.

But first, 

prepare your paint 
and have plenty ready


Then dip the kitchen towel into the paint


and dab onto your paper


In my version I painted the trunk first
then added some lines for branches later


To recap:
Plenty of Paint  >  Dip scrunched up kitchen towel into the paint  >
  Dab onto paper  >  Paint the trunk and branches before or after (it's entirely up to you).


Monday, 25 April 2016

Circles and your pathway to a drawing

You hear art professionals teaching their drawing techniques.  Their knowledge and experience is very important to us all, whether we are beginners or experienced artists brushing up on some basic skills.  I do have to say that, for beginners in particular, the technique of drawing circles can seem daunting.  It is easy to see the principle of the exercise, but actually it can fill the beginner with a lack of confidence.  All those circles take over in the eye of the beginner, looking nothing like the subject they are trying to draw, and hence they tend to give up.

Here I'm using a photograph of our lurcher, William (many of you will be familiar with this lad, since I draw him almost every day).  


 Step 1:  Draw the basic 'shapes' first.  Ignore detail.....


Step 2: 
Having referred back to the photo, I saw that the head needed to move toward the viewer.  I also added the football in his mouth.....

Step 3: Now is the point at which I put in some detail.
Note that the initial circles are still there, but I'm 'correcting' some angles.....


Step 4: With that done I can erase the unnecessary circles -
and I have my drawing.....


and Step 5: Add some watercolour -
plus in this case some 'action' lines to indicate movement.....

A simple enough exercise.
Recap: From all those circles, you will find the pathway to your final drawing.


Wednesday, 30 March 2016

Drawing Rocks in watercolour

Basically very easy to do...

I used three colours for these rocks

YELLOW OCHRE

BURNT UMBER

ULTRAMARINE BLUE


I thought it would be easier to do a video to show you this:


the completed painting: