"MAKE A CONFIDENT MISTAKE NOT A TIMID ATTEMPT"

Sunday, 20 December 2015

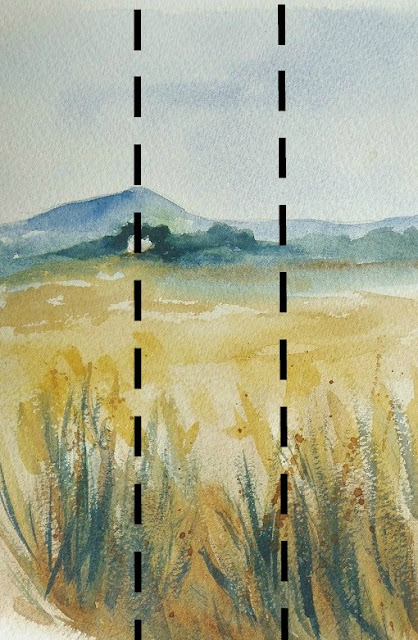
Just turn the painting around

Often when painting something, it becomes a case of how to get to a different angle in the painting.


Simple, just remember to Turn the Painting Around.


I know, it seems obvious, but very often particularly when you have used tape to secure the art first, you forget to do this simple task.

just reminding you that's all....happy painting all.


Saturday, 14 November 2015

Drawing Large buildings


Say for example you want to sketch a large building.  Lets face it, when we are sketching on our travels, we often look up at large buildings, so this is how I go about drawing them.

I think in terms of Shape     as with this photograph - (I have mentioned Shapes before here).


AND THAT'S THE KEY TO LOOKING UP
AND SKETCHING SOME BUILDINGS -
 THE PERSPECTIVE ELEMENT

LARGER AT THE BOTTOM
TAPERING SMALLER TOWARDS THE 
TOP


a TRIANGLE

Makes sketching much easier when you keep this principle in mind


Thursday, 22 October 2015

IT ISN'T JUST ART

I LOVE ART, but it is not just the drawing, painting, sketching process that I enjoy.  My biggest gain is that it lets me see more of life around me.  Things I may have missed, just because they are there and taken for granted.  When you paint, you see it in closer detail.  What a great bonus ART is.

Wednesday, 21 October 2015

Drawing Trees

Trees can be tricky things to draw, especially when they are like this...


All those little twigs!


My Tip is keep drawing.....the more twigs you add the better and more realistic it becomes.

Look...


Sunday, 11 October 2015

Where to place the point of interest...


My example is this simple landscape with a house in the distance.

Firstly, the house shows up because it is set against a dark background...
remember:  Light against Dark and Dark against Light always has impact.

But moving on to the point of this post...

Never place the main subject in the Middle of a painting
Always put it slightly off centre, it's far more interesting to the viewer -


 Work with the One-third Rule


If I flip this painting you will see that you could have the point of interest on the right
and it works just as easily because it is in the one-third section of the painting.


Thursday, 30 July 2015

Acrylic paint - palette clean up

Once Acrylic paint has dried on your palette, it can be very difficult to remove.   That's why I use a PLASTIC disposable plate, with a shiny surface for mixing my acrylics....

~ you see it has a shiny surface ~


Then it ends up looking like this after I've been adding paint...


When you have finished using the paint,
and it has dried on completely,
that's when it is the easiest to remove.

Just
PEEL IT OFF.


 I just use a damp cloth 
to clean up any tiny bits left behind.


Monday, 6 July 2015

Dark Green

Getting a really good Dark Green could be several blog posts and more, but I keep it simple....


Everyone has their own favourite combinations...this is just one of them for me that works well.

Remember...Whatever combination you use - make sure you replicate the individual colours somewhere else in your painting...it keeps continuity.


Wednesday, 17 June 2015

Applying masking fluid

One tip I gave a while ago....here's the blog post on RUINED BRUSHES USING MASKING FLUID - click the link.

But another question arises when actually putting masking fluid onto the paper and what to use to apply it (other than brushes).   The answer is, almost anything goes.  If you find the edge of an old store/credit card works, then use it.   The same goes for cotton buds, cocktail sticks.  If you need to cover an area in preparation for sparkly water reflections, then an old toothbrush with masking fluid on it works well too.   Just make sure you leave it to dry completely before continuing with your painting, that rule always applies when using masking fluid.

How to actually apply it....You can put it straight onto dry paper.  But one tip I like is for SOFT EDGES and that isn't so difficult with masking fluid.   Just wet the paper with clear water beforehand...not Just the area you want to be left clear of paint either...you need to apply the water further than you intend....add the Masking fluid and wait for it all to dry....when you have finished the painting and remove the masking, you will have a soft edge,  the clear water will have done its job.

Sorry I have no pictures of this.  I'm out of masking fluid at the moment!!!   When I have some more, I will do a picture blog post to show the results of soft edges using masking, but hope this helps in the meantime.


Thursday, 4 June 2015

Do you have trouble sketching en plein air...

It can be intimidating.  The main thing is to take things gradually, don't try to sketch a vast scene, just pick a small portion of it.

If you're sketching buildings, or views in general and have trouble with angles, then try this little tip.

Get a piece of clear acetate.  You will need to support it as it can be quite floppy to hold, so I used two mount boards for mine and taped them up, this holds the acetate nicely and makes it easy to hold.


For my example I'm just showing a line of hills, but this could be the tops of buildings...You will need to use a fibre pen eg: tikky graphic, uniball etc that sort of pen ~ or any that will show the lines on the acetate (I then just use a wipe to clean it off afterwards)


When drawn, hold the acetate over your paper and follow the lines with pen or pencil......

Top Tip: it helps if you close one eye for this...it focuses you better.


and there you have it

A simple way to get the Outline you want, especially if you are
en plein air drawing.

~ hope this tip helps ~


Monday, 25 May 2015

Painting plough lines....

....or any lines that start in the foreground and meet at one point in the distance.

like this:


just put your finger on the painting at the point you want the lines to meet...


keeping your finger on the spot helps guide you...


I did this short video
- albeit trying to video around the camera tripod...not easy -

but hope you get the idea...


Friday, 15 May 2015

Drawing straight lines

How many times do you hear people say.... "I would love to draw but I can't even draw a straight line"!

Well here's something - NEITHER CAN I.   The simple solution is USE A RULER.

In other words, what ever means there is available to help you achieve a result, then jolly well use it!


Tuesday, 12 May 2015

The rules can be broken


Generally most landscape views are in

Landscape format

This painting is, in fact, in

PORTRAIT format

but I reckon it still works


SO WHAT THE HECK

BREAK THE RULES SOMETIMES!


Sunday, 10 May 2015

Deciding on the composition....

.....not always easy, 
but there are some simple rules to follow.

The classic
L shape is one starting point, particularly noticeable in landscapes.


here I've overlaid an example....


This L shape can also be reversed,
 but basically it creates a stopping point for the viewer.


Simple but very effective.


Sunday, 3 May 2015

Shapes

Worried about how to draw an object or scene.  Go back to basics.  Look for the SHAPE.  Some objects have more than one Shape, so if you can see them, then draw them. Overlapping, or whatever....give it a try.


If you look at the  picture you will start to see these shapes in various other places.


Once you start to Look For Shapes, you will see them more readily.  Of course, some are obvious:


Although this next photo is a complicated scene, it can be broken down into simple Shapes.

 I bet you look at this picture and start finding those shapes!
If anyone would like to use this photo for a painting then please feel free to use it.


Thursday, 23 April 2015

Lifting Paint

In this example I'll use a painting I've worked on recently.  There was an area I just wasn't happy with. 


This is the photo I used as reference, with thanks to an online friend for the use of ....


As you see from the photo, the chicken was actually sitting down fluffing it's feathers up...but in my painting it doesn't look like it is sitting.  

In simple terms: I had not added the foot properly and it bothered me.  So decided to 'lift' some paint out to create the foot, and hopefully it would then appear to be sitting.

METHOD:

1.  Wait for the paint to completely dry.  You can only do this technique successfully when the paint is totally dry.

2.  I used a small flat synthetic brush as it would give me more control and also enable the shape of the foot to be achieved.


3.  Using clear water on the brush I lightly scrubbed the area needed and then quickly used a kitchen towel to dry that area.   (If you don't dry it quickly, you will inadvertently find the water used will spread and create more problems, for example 'blooms').


An easy remedy - 
the chicken now looks like it is sitting.


Tuesday, 21 April 2015

Using a paint brush the correct size for your subject

Okay, it seems simple enough, but you wouldn't believe the number of people who forget to consider this.


Large brush for big paintings - Small brush for small paintings and detail.

I've seen people pick up a brush and think they need to use it for ALL of the painting they are working on.

START WITH THE CORRECT SIZED BRUSH....ONE THAT YOU ARE COMFORTABLE USING.


Remember to also CHANGE TO A DIFFERENT SIZED BRUSH AS YOU NEED IT
DURING YOUR PAINTING PROCESS.

A very valid comment has been made by Robin at Pink House Studio -
I'm adding it here as it needs to be kept in mind if you are
doing a loose painting....

~ thanks Robin ~


Great feed back in the Comments:

Here's what Judy over at   dedraadaquarellen  has to say:

~ thanks Judy~


Tuesday, 7 April 2015

Mirror Image


If you are unsure about a painting and ask yourself
if it looks a completely finished piece then
just hold up a mirror and look at the painting.

By viewing via a mirror it shows up any inconsistencies
which you can then correct.


Give it a try and let me know
what you think.


Tuesday, 31 March 2015

Looking at depth of colour in the sky and sea

Have you ever noticed.  When you paint the SKY the darkest area is at the Top, the weakest is towards the bottom...that's because the sky recedes into the distance and that is seen as a weaker colour.

The opposite happens with the SEA.... that is Darkest in the distance.  (I remember this by thinking  the further you look out to sea, that's where the sea is at its deepest...hence the Darkest colour).  The foreground (nearest the viewer) is a weaker colour.

Does that makes sence???  well, yes I think it does....look at my illustration...


Do you get it?

Hope this helps.


Thursday, 26 March 2015

Ruined Brushes - Acrylic use

From time to time we all end up with a ruined brush, when the bristles dry solid and won't move. This often occurs when using Acrylic paints as they dry quick or when using masking fluid,
we forget to rinse the brush out properly.

Don't throw the brush away though, it can still have a use.


For example when you want to do some stippling...they are perfect for the job.  Just 'disturb' the bristles a little with your fingers, but don't worry if they won't move greatly, you can still use it.


Perfect for those distant tree lines and hedgerows in a painting.
The ruined brush is now a useful brush,
not only for using with acrylic paint but also for oils and watercolours.


Tuesday, 24 March 2015

Watercolour loose style painting in three steps

Keep in mind folks that this is my personal opinion on how I go about this particular style of painting.  Others no doubt might make the point that my technique is not for them, that's okay by me, but I just wanted to explain what I did to make this painting of a Lamb....

No pencil sketch just

 Starting with One brush full of paint
in three steps
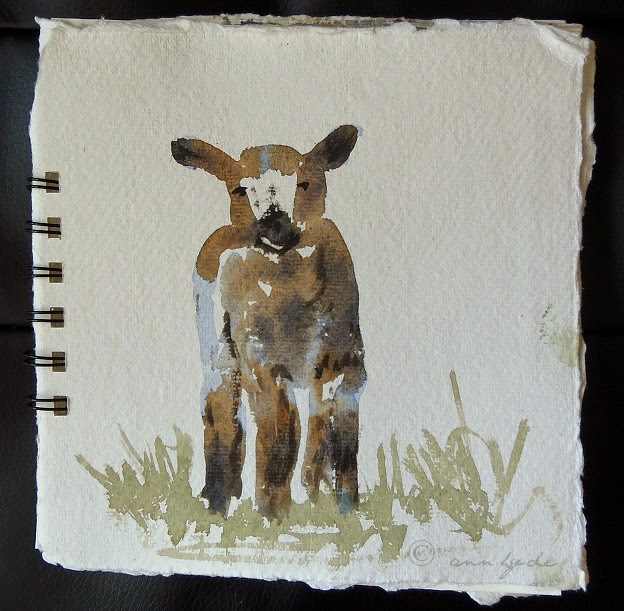
ref. photo from PaintMyPhoto-ClareSmith

Note:  For this I used Khadi paper, and a Kolinsky Sable Brush.  Sable brushes are the best for holding a lot of paint, which was ideal for this particular technique of painting.   

Prepare your paint before you begin, so it is ready to go as you need it. 

If you look at the painting of the Lamb you will see where these Three Steps to the painting are
(I haven't shown the step-by-step in photos, I think it's better if you study the painting, that way you will be observing more) :

1. Start with the Palest tone.  (the pale tones were pre-mixes of Burnt Umber and Ultramarine Blue)
With the Palest tone I started with an ear and worked my way down, leaving some gaps of paper here and there for highlights.  (You can leave this to completely dry), but for this painting I chose to continue to Step 2 whilst the paint here was still wet.......

2. Mid-tone.    (this is obviously going to be darker than Step 1)
Look for those Mid-tone areas now and drop this into the still wet paint of Step 1.  (This is why you need to pre-mix your paints).   Now leave it all to dry completely - very important.

3. Darkest tone.
With your Darkest tones paint the detailed areas.  This is the fun part of the whole painting as this step brings out all the detail and holds the painting together.

Now all you need do is add any extra bits and pieces to your art work, for me it was the grass.

So to recap:

One Brush

Pre-mixed paint

Steps 1, 2, 3.


**************


Saturday, 21 March 2015

Ruined brushes when using Masking fluid

When using Masking fluid :

To save your brushes just put a little soap on your brush first.

Then use the masking fluid.  When you have finished wash your brush out with cold water.

I actually use specific Masking Fluid brushes, but any suitable brush will do.


(note: never use warm or hot water for cleaning your brushes - the bristles are held with some glue in the ferrule and that would melt in warm or hot water, guaranteed to ruin your brush)!


Friday, 20 March 2015

Watercolour paper that buckles and stretches

We've all been there.  Painting a watercolour and what happens, the paper buckles up and warps.  There are various ways to deal with this and okay, we can get pre-stretched paper and also stretch the paper ourselves, but that is a bit of a hassle don't you think.

One solution is to just buy watercolour Blocks.... the paper is glued on all sides.  This means that you paint without the paper buckling up on you.  Then when you have completed your painting you just remove it from the block.

Here's an example of one of my watercolour blocks.  There are plenty of makes out there, the one I'm using at the moment is a Matthew Palmer watercolour block with Fontaine paper.  Incidentally the Fontaine paper is quite tough and can take quite a bit of work on it


Easy!